Tuesday 27 December 2011

The Dyno Tuning

The engine went through several session of dyno tunings.  This was off course done after the engine has been broken-in for approximately 1000km.  There are multiple methods of engine break-in out there, each of them has its pros and cons.  Since I was not really in a hurry, so I had chosen the conventional way of the 1000km road travel.

And it went through several sessions of dyno tuning, since every time there are more adjustments to be made, some tweaking here and there, and due to availability of the dyno machine, the sessions had to be carried out in different locations each time, but all the machines are the same (DynoJet), so the results are hopefully consistent.

Here's the car all strapped up on a dyno in a workshop somewhere in Damansara area (can't remember the exact name of the place).

Final checks on the engine before starting the run.
And this my my good friend Zaki, who helped me on the tuning.  He had also given me many tuning lessons on Crome and Hondata.  He is certainly a very good tuner and is willing to share his knowledge and experience to most of us, so he is highly recommended for tuning solution.

As I mentioned earlier, the engine went through several dyno tuning sessions.  So I'm kind of lost track as to when, where and which dyno sheet associated with the session, so I'm just going to post all of them here.


Thursday 20 October 2011

Now's Let's Put All the Stuffs Together.....

OK I think I have covered everything, well most of it.  Might have missed a few items, but it'll be covered along the way.  The journey is still long.  Well some said it never ends.  There is always something to be modded.  Well it's true.

At the time of the engine completion, the Goldmember chasis is not around yet.  So I had to use my daily ride, a Honda Civic EK3, as the test bench of this engine.  Here's what it looks like in its engine bay.

To ignite the Air and Fuel, I opted for the MSD Ignition system.  I hope to be able to eliminate one of Honda most problematic area, it's "fragile" distributor.  There have been so many cases of distributor failure in Honda's B-series engine, during races and even during daily commute to work.  The stock distributor just can't cope with the frequent high revving engine, so either its coil or ignitor would just give way without a warning.  I managed to get a used MSD 6AL Ignition Box (the now discontinued P/N 6420) at a cheap price to amplify the ignition spark.  Then I get it to work with an MSD SS Coil (P/N 8207) to replace the stock internal coil, together with MSD 8.5mm Super Conductor plug cables, then the MSD Distributor cap (P/N 82921) which comes with an additional tower for connecting to the external coil.  Here's where I had them installed in the engine bay.


Passenger side view of the engine bay.  Note the clearance provided by the FAL Radiator fan.


To ease up the crankcase pressure, I replaced the stock breather box with the unit produced by Endyn Engineering, which has a feedback pipe to feed the captured engine oil back into circulation in the engine block.
A smaller breather filter is added to release the head pressure and deal with the blow-by, not very effective I must say, but it'll do for now.  In the future, I will be adding another one of those Endyn's Breather Tank just for the head cover..

Another view of the Breather Tank, MSD distributor cap and the AEM Cold Air Intake pipe.

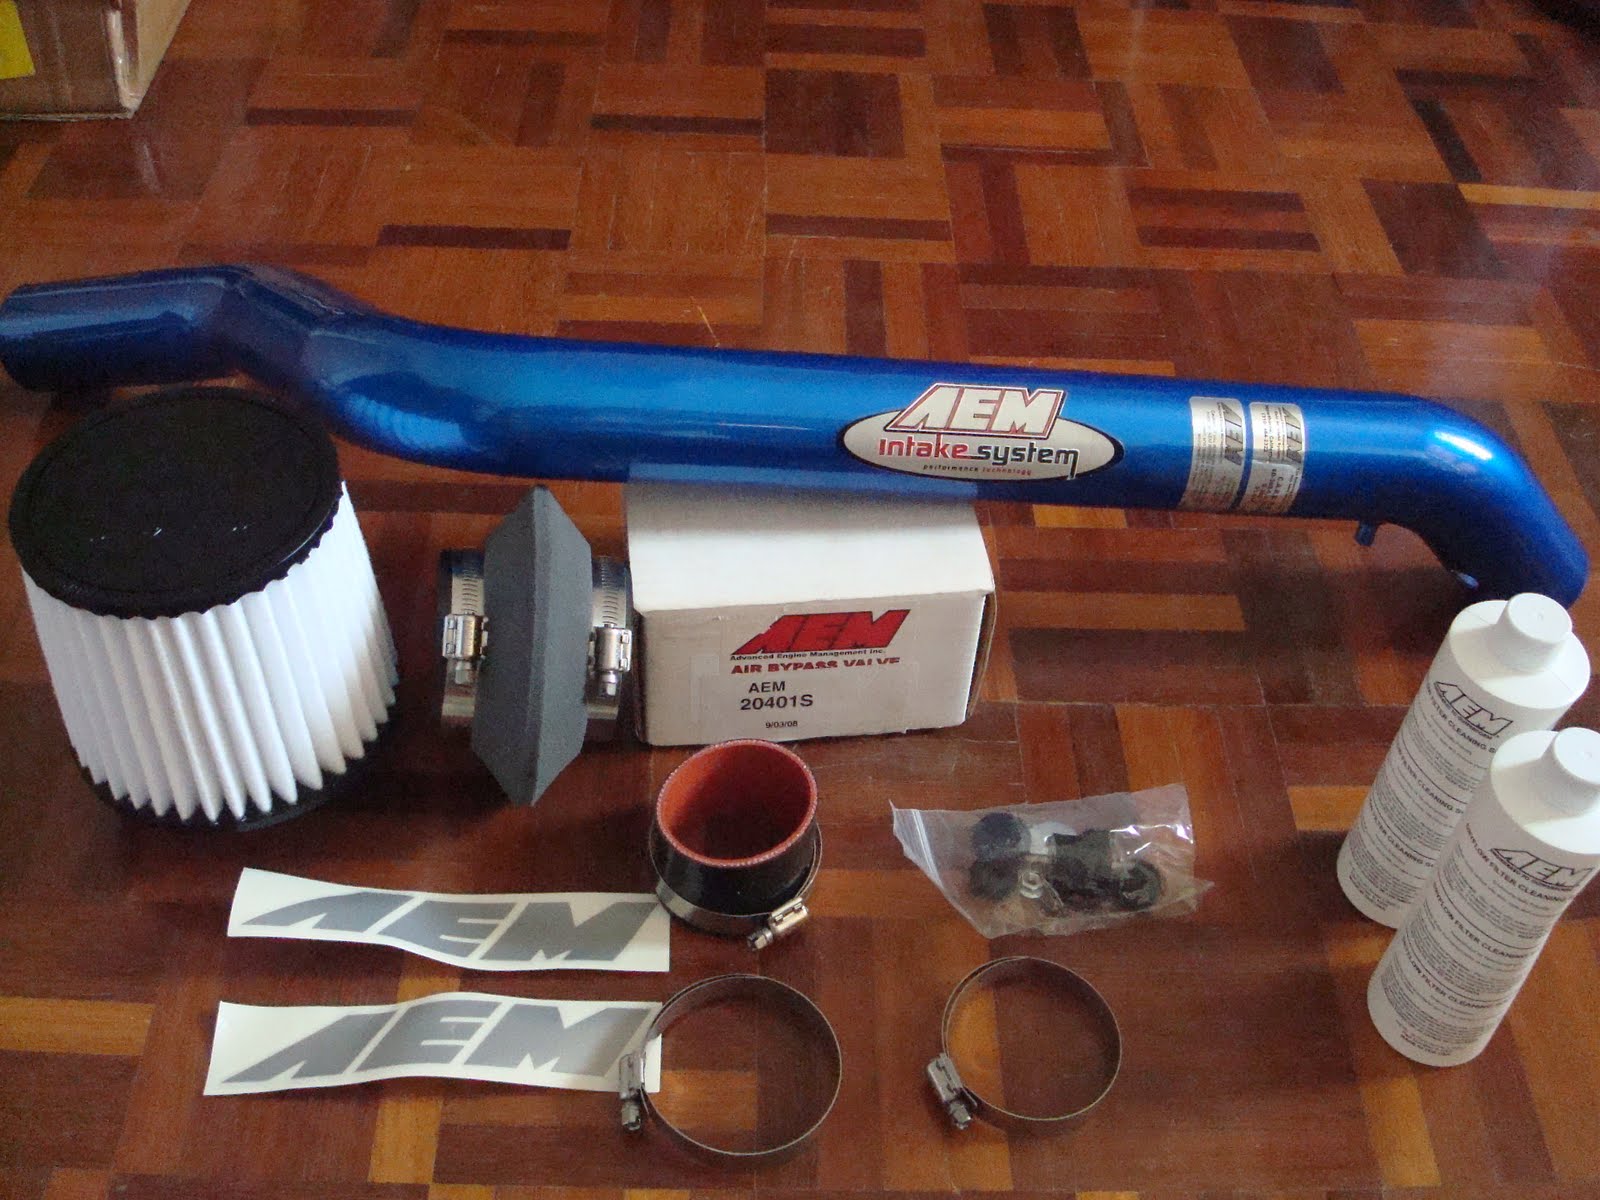
The cold air is delivered by the AEM Cold Air Intake through its pipe that goes all the way down to the driver side's front bumper.

I drilled a hole in the bumper to help channel the rushing air to the AEM air filter in the bumper.   During race, I remove the air filter altogether and replaced it with a Blox Racing Velocity Stack.
The exhaust gas is extracted from the engine through a J's Racing 4-2-1 header.  I was still researching for a US-made header at that moment.  More on this later.


A set of Full Race ProStreet Traction bars helps plant the tires to the road to avoid wheel hop during high rpm launch.

The cams are being set to its specified centerline.  Any advancing and/or retarding of the individual cams will be done on the dyno, if necessary.

I added an Ingalls Engine Torque Damper, to help reduce the engine movement in high acceleration, hence reducing the wear on the engine mounts.

Final views of the completed engine bay.

Now, it's time to hit the dyno!

Sunday 7 August 2011

Breathing Cooler Air

It's a well known fact that colder air has higher O2 density than hot air.  Hence if we could supply as much cold air as possible into the combustion chamber, we will have a better chance of increasing the power output of the engine.  So that's being the motivation, it's time to look for the best Cold Air Intake (CAI) system available.

After much readings, it seems that the AEM cold air intake is best intake system on the market. Many have proven via dyno result that this system makes the most power of ANY intake system in the market, in comparison with other brands such Iceman, Weapon R, RS Akimoto, PRM, etc. Some of the reasons include how the system was engineered where AEM claimed that they "tunes" the system to each application - the length of the overall tubing, the diameter of the tubing, and the minimal number of bends all work together to make this system create the maximum power from your motor.  In addition, the tubes are ceramic-coated, which reduces the absorption of heat from the engine bay.

So I've decided to go with AEM.  Unfortunately, I 've made a mistake during ordering the correct P/N for the CAI.  There are so many models available in AEM's catalog.  So I thought I should go with the one that is meant for the chasis i.e. 4 door EK.  I ended up with this:


Upon its arrival, I found out that it didn't fit my EK's engine bay.  The design of the pipe requires it to go through a hole at the chasis beam behind the headlight, which my EK doesn't has that.  I can either drill a hole for the pipe to go through, or sell it off and buy the correct one.  I decided to go with the latter, and the AEM CAI fits nicely in my friend's EJ (locally assembled EK i.e. Malaysian Domestic Market or MDM).


Back to AEM catalog, after much studying on the model numbers, I then realized that there is in fact a hybrid unit that is meant for B-series engine transplant into the Civics.  The unit comes in a larger pipe diameter at 3", instead of 2.5" like my previous unit.  It is obvious now that this is the one for me.  How here it is, as it arrived to me:


The good thing about this unit is that it comes with the replacement bracket for the gearbox, so we can discard the bulky and ugly front gearbox bracket, and replace it with the nice and shiny bracket in the bottom left of the above photo.  I'll show you how it looks in the engine bay later on.


The air filter is grey in color instead of white.


This is the Air Bypass Valve, which is meant to avoid the intake system from sucking water into the engine.  If there is an occasion where there is a heavy rain or the car is being driven through a pool of water that the end of the intake is completely submerged, this handy thingy is supposed to let air comes through it (instead of from the end of the pipe) thus avoiding water from being sucked into the engine and kills it.  But I am not going to install it, since I usually don't go trouble myself driving through a pool of water on the road if I see them (although that is sometimes quite hard to avoid in this country by the way).

Friday 5 August 2011

Fueling the Fire

In the past, I had encountered several occasions on the dyno where the tuner said something like: "Can't go higher (whp), fuel maxed out already!".  I'm sure many of us have had the same problem during our crave for more power out of the engine.  To those who are unfamiliar with the term, it means that the stock fuel system can no longer be tweaked any further to supply more fuel to the combustion chamber to make more power.

Because of the modifications done to the cylinder head, as well as replacement of the intake manifold and throttle body, and usage of higher profile camshafts, the amount of air that is rushing into the combustion chamber has increased significantly.  To take advantage of this, more fuel is needed to keep the Air/Fuel ratio at its optimum level to produce the much desired power.  Coupled with proper ignition tuning, we should be able to fine tune the engine to work exactly like what we want it to, when we want it to.  Good idle when standing still, and when we floor the paddle, it would give us a big grin in face.  Because of this, fuel system upgrade is essential!

The first to look at is the fuel pump.  The stock fuel pump is said to be more than enough for application up to 200whp.  That should be enough for the engine that I am building now.  Nevertheless, I have replaced the stock fuel pump with one from the EP3 Civic Type R, since the later is relatively newer than the stock fuel pump that might have been there in the tank since 1996.  So hopefully it'll perform better and will last longer.  Some said that its flow rate is somewhat higher than the stock pump, but I can't find a written data to support that claim.  The pump looks exactly like the stock fuel pump, so there's no need for its photo .

Next is the fuel filter.  I went for the AEM unit.  The manufacturer claimed that it flows better than OEM filter.  But honestly, I picked it because it look nicer than then stock unit, and add colors to the engine bay.


Exiting from the filter, I have replaced the stock fuel hose with a stainless steel braided unit by Russell.  Unfortunately I forgot to take a photo of it, but it's a complete kit that looks like this:
The hose is then attached to the Skunk2 Composite Fuel Rail, that is lighter and stronger (as well as nicer) that the stock rail, and claimed by the manufacturer to cause the fuel to flow at a much colder temperature than the stock metal unit.

Finally, the task of spraying the fuel directly into the combustion chamber is given to a set of 370cc RC Engineering saturated fuel injectors.  This should give sufficient fuel for my current application, as well as future modification if I decide to go with higher requirement (if the injectors last that long!).


Sunday 31 July 2011

Static Compression Ratio

OK all these while I have been talking about this compression ratio (CR) thingy.  What is it actually?  In simple words, it is just the ratio between the Volume of the Combustion Chamber when the piston is at the bottom-most of its travel (Bottom Dead Center = BDC) divided by the Volume of the Combustion Chamber when the piston is at the top-most of its travel (Top Dead Center = TDC).  It's a direct effect of the combination of several components of the engine internals, and there are physics and mathematical calculations to measure these CR.

Sounds complicated?  If you're "smart" like me, then don't trouble your brain to study the formulas, dimensions and thermodynamics of all the mechanical stuffs in the engine to calculate your static CR.  There are many readily available online calculators nowadays.  Just pick one (or several) of those calculators, key in the necessary numbers, and it's calculate the CR right away.  All these calculators are estimates though, but it's good enough to make a quick check to see whether you have the good recipe for power, or heading for destruction.

I often use this calculator by Zeal Autowerks for my calculation.  So far it is the most accurate one there is.  It also has the customized calculator for B-Series.  Here's a sample calculation of the static CR of the engine that I am building now:
If you insist on studying the mathematical calculations behind calculator like these, I recommend you to read it here.

Wednesday 20 July 2011

OMG....I'm so in love with coupes.....

Commercial break, folks!

Can the owner of this cool car please call me?  I want to buy your car! Just name your price, dude!


OK jokes asides, I really love EK coupe.  But the selling price is damn crazy in this country.  I may never be able to own one of these here anytime soon, at this salary, without selling my soul to the devils first.  By the time its price may reach a reasonable figure, it might already be too old and too costly to rebuild it to Auto Show condition.  Or I might already be too old myself to still be playing cars!

Oh well, dreaming is free!

Intake: Breathing Apparatus

The Skunk2 Pro Series intake manifold is, by far, looks much nicer than the Type R ones.  OK that sound so immature, judging the quality of stuffs from its mere physical outlook.  The good build quality and professional looks are off course bonus points, but the true and dyno proven fact is the Skunk2 intake manifold is definitely better than the OEM Type R intake.  The Skunk2 website stated that their manifold increases the engine horsepower for about 8% from the stock manifold, that's a good enough reason for me to get it, while improving the looks of the engine bay as well.  Beware of imitation though!

The Throttle Body inlet of an original Skunk2 manifold is able to be bored to a maximum of 75mm diameter to satisfy those "Gila Kuasa" people like you (and me!), you can't do that on the fake ones without destroying it in the process.

The plenum is larger than the OEM, and the more obvious difference is the re-design of the runner for cylinder No.1, which improves the air flow significantly.  I'm not making claims for Skunk2, I make no money in promoting their product (I wish I do though!), but these are also based on cumulative personal experience and dyno runs by people I know. 

It might not be the best one out there as well, but it sure is the best bang-for-buck manifold for builder with tight budget like me.  If money is not a problem to you, then I'll recommend you to get this one instead (yummy!).  Me? I literally might have to sell one of my kidney (and perhaps testicles as well!) to afford one of these.

I went for the 68mm Skunk2 Pro Series throttle body for this build.  At that time the biggest size available was 70mm.  But remember, I will also be driving this engine to work.  Too big the throttle body, and you may have problem at part throttle or cruising mode.  Say you are cruising at the highway, enjoying the drive with Siti Nurhaliza song on the radio, then all of the sudden a Wiralution passes by, and you decided to harass them, if you're on 70mm, the moment you drop the gear and floor the gas pedal, there is a high chance that the engine will first bog down for a few seconds, before it accelerates again.  Now that's embarrassing, and frustrating too!  With 68mm, plus the medium compression engine and Stage 2 cam that I am using, that never happens.  Big is not always better.  I'm talking about throttle bodies!  The same can't be said for other things, for example, boobs, among others.


A few other plus features of the Skunk2 throttle body are the personalized serial number (supposedly the serial number is unique), and the MAP sensor has been relocated to the bottom, hence improving it appearance as well.  Be sure to port match it to your intake manifold, it's a must!