Sunday 31 July 2011

Static Compression Ratio

OK all these while I have been talking about this compression ratio (CR) thingy.  What is it actually?  In simple words, it is just the ratio between the Volume of the Combustion Chamber when the piston is at the bottom-most of its travel (Bottom Dead Center = BDC) divided by the Volume of the Combustion Chamber when the piston is at the top-most of its travel (Top Dead Center = TDC).  It's a direct effect of the combination of several components of the engine internals, and there are physics and mathematical calculations to measure these CR.

Sounds complicated?  If you're "smart" like me, then don't trouble your brain to study the formulas, dimensions and thermodynamics of all the mechanical stuffs in the engine to calculate your static CR.  There are many readily available online calculators nowadays.  Just pick one (or several) of those calculators, key in the necessary numbers, and it's calculate the CR right away.  All these calculators are estimates though, but it's good enough to make a quick check to see whether you have the good recipe for power, or heading for destruction.

I often use this calculator by Zeal Autowerks for my calculation.  So far it is the most accurate one there is.  It also has the customized calculator for B-Series.  Here's a sample calculation of the static CR of the engine that I am building now:
If you insist on studying the mathematical calculations behind calculator like these, I recommend you to read it here.

Wednesday 20 July 2011

OMG....I'm so in love with coupes.....

Commercial break, folks!

Can the owner of this cool car please call me?  I want to buy your car! Just name your price, dude!


OK jokes asides, I really love EK coupe.  But the selling price is damn crazy in this country.  I may never be able to own one of these here anytime soon, at this salary, without selling my soul to the devils first.  By the time its price may reach a reasonable figure, it might already be too old and too costly to rebuild it to Auto Show condition.  Or I might already be too old myself to still be playing cars!

Oh well, dreaming is free!

Intake: Breathing Apparatus

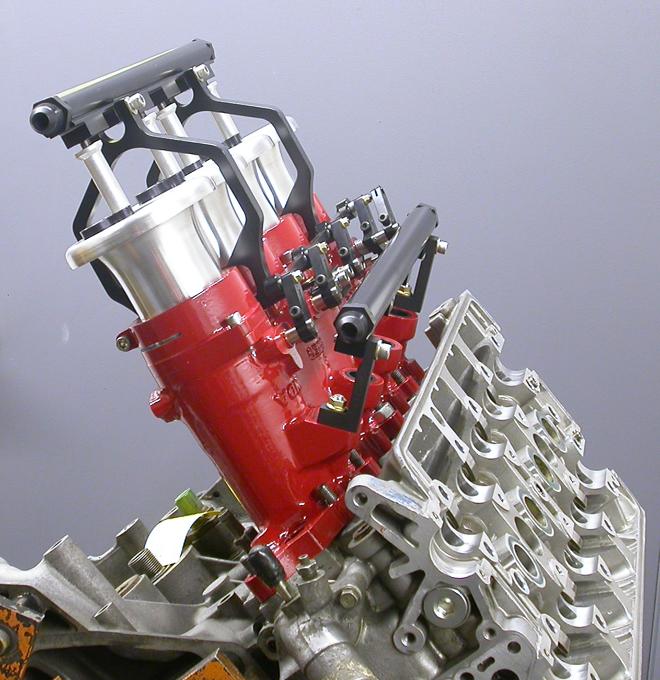
The Skunk2 Pro Series intake manifold is, by far, looks much nicer than the Type R ones.  OK that sound so immature, judging the quality of stuffs from its mere physical outlook.  The good build quality and professional looks are off course bonus points, but the true and dyno proven fact is the Skunk2 intake manifold is definitely better than the OEM Type R intake.  The Skunk2 website stated that their manifold increases the engine horsepower for about 8% from the stock manifold, that's a good enough reason for me to get it, while improving the looks of the engine bay as well.  Beware of imitation though!

The Throttle Body inlet of an original Skunk2 manifold is able to be bored to a maximum of 75mm diameter to satisfy those "Gila Kuasa" people like you (and me!), you can't do that on the fake ones without destroying it in the process.

The plenum is larger than the OEM, and the more obvious difference is the re-design of the runner for cylinder No.1, which improves the air flow significantly.  I'm not making claims for Skunk2, I make no money in promoting their product (I wish I do though!), but these are also based on cumulative personal experience and dyno runs by people I know. 

It might not be the best one out there as well, but it sure is the best bang-for-buck manifold for builder with tight budget like me.  If money is not a problem to you, then I'll recommend you to get this one instead (yummy!).  Me? I literally might have to sell one of my kidney (and perhaps testicles as well!) to afford one of these.

I went for the 68mm Skunk2 Pro Series throttle body for this build.  At that time the biggest size available was 70mm.  But remember, I will also be driving this engine to work.  Too big the throttle body, and you may have problem at part throttle or cruising mode.  Say you are cruising at the highway, enjoying the drive with Siti Nurhaliza song on the radio, then all of the sudden a Wiralution passes by, and you decided to harass them, if you're on 70mm, the moment you drop the gear and floor the gas pedal, there is a high chance that the engine will first bog down for a few seconds, before it accelerates again.  Now that's embarrassing, and frustrating too!  With 68mm, plus the medium compression engine and Stage 2 cam that I am using, that never happens.  Big is not always better.  I'm talking about throttle bodies!  The same can't be said for other things, for example, boobs, among others.


A few other plus features of the Skunk2 throttle body are the personalized serial number (supposedly the serial number is unique), and the MAP sensor has been relocated to the bottom, hence improving it appearance as well.  Be sure to port match it to your intake manifold, it's a must!


Sunday 17 July 2011

Engine: Cams and Valvetrain Components

Now to the important decision for most engine builders: Which cams to use?

Have I mentioned that this is going to be a Skunk2 equipped engine?  If not, well it is.  But still, which cams?  I have done my research and I am leaning towards the Pro Series off course, due to its superior mid-range gains in comparison with the Tuner Series.  I might be driving my car to work as well, so I need those mid-range torque rather than having to rev at top rpm just to overtake sightseeing vehicles on the road.  So I explained my intention and constraints to Chris (Pentagon) and he recommended the Pro 2+, especially since the engine is going to be somewhat in the 12+ static compression ratio, so the Pro 3+ is out of the question.  Remember that in order to make power with high profile camshafts the engine need to have the minimum static compression ratio, or else you're gonna lose power instead of gaining more.  So again, don't be greedy (i.e. gila kuasa!), let's reserve the extreme for later!


As for the cam pulleys, I went for the Tuner Series instead.  To me, it looks nicer than the Pro Series ones.  And it's available in Blue.  I like Blue.  Who doesn't?


The Pro Series valvesprings to go with the Pro Series camshafts:

The Titanium retainers set:

And finally, the Forged valves, standard sizes, high-compression units:

Here's the valves all lined up and numbered, ready for installation.  All the valve locks or keepers are also brand new, using Honda OEM units.

Engine: Cylinder Head

The cylinder head was originally from a B16B as well.  It was then further enhanced with 3-angle valve jobs, as well as ported and polished to improve air flow.  Due to the unavailability of proper air flow bench equipment, we had to rely on the expertise and experience of my mechanic Din, who had many years of engine building experience.  Without the test equipment, there is really no way for us to measure the improvement (or not!) of the cylinder head air flow after the process.  Nevertheless, upon visual inspection of the finished product, it was not bad at all!  We just hope it'll work as good as it looks.  Check it out:


Friday 8 July 2011

Engine: Block and Rotating Assemblies

The block of choice for my build up was the B16B from the Honda Civic EK9.  Quite simply because since it is from the "R" family, so supposedly it should be able to take the high revving beatings that we plan on giving it.  And since it shares the same dimensions as its big brother the B18CR means that it can be stroked up to 1800cc while maintaining its modest appearance as if it is a 1600cc engine.  Its original internals (77.4mm crankshaft and 142.42mm connecting rod) were ditched, probably had ended up somewhere in the metal junkyard.  Luckily its PCT 81mm pistons had some worth in the second hand markets, so they were sold to a friend.

A used set of 87.2mm crankshaft and 137.9mm connecting rods from the B18CR engine were bought from a friend, Chris Tan of Pentagon Enterprise.  He is also the responsible guy who had introduced me to the whole line of Skunk2 product, and eventually became the main supplier of the majority of the engine component for this build.  These are the crankshafts and connecting rods when I got them from him.


The physical proofs that they are indeed Type R parts.


The pistons were 82mm Wiseco Forged pistons (P/N: K566M82), which was considered as medium compression that would produce 11.8 - 12.25:1 static compression ratio.  This was my first engine build, so I figured, let's be modest and safe first, rather than aiming for the sky.  If we survive this, perhaps we'll gather enough knowledge and experience to build something more extreme later on.   Here are the pistons.


The pistons and the connecting rods now assembled and ready for installation.

The block was earlier sent to a machine shop in Sg Besi for the the process of boring, honing and fitting of the 82mm pistons, as well as balancing all the rotating assembly components (including the flywheel).  It was a basic and simple process actually, but since there were very, very few machining shop that are capable of doing it at that time, it took almost 3-4 months, where the majority of the time was waiting for my turn for the machine.  And the queue was very, very long indeed.  Once done, all of them were taken back to the workshop, where my chief mechanic, Din (a.k.a. Din Danau Kota, Din Kecik) of Speedtune Autoworks, will demonstrate his excellent skills on engine building.

And here's the engine block, completely assembled, with the block brace in place as well.


Tuesday 5 July 2011

The Reason Behind All These.....and the Test Bed

OK at this point, I need to let you know that the engine build up had actually started much, much earlier than the arrival of the GoldMember.  Originally, I had no concrete plan on seriously participating in any drag racing.  Quite frankly, here is the reason for the engine build up.

At that time around late 2007 or early 2008, majority of my fellow enthusiasts in engine modification were very much into JDM components for their build.  Brands such as Spoon, Mugen, Jun, Toda and the likes, from the land of the rising sun, were all over the place.  Sought after by many, has caused the prices to go beyond reach for "pokai" person like myself.  Yeah I know fast and cheap doesn't always rhyme together, but there must be an alternative to go fast, without having to sell your kidney for a pair of Jun 3 cams.  That's when I turn to USDM products.  Brands like Skunk2 came into the picture.  I realized that I could get a complete set of brand new Skunk2 cams, valve spring and retainer at a fraction of the price for a used Jun 3 cams only.  There you go, once you go American, there is no turning back!

So I started "collecting" USDM products for the engine build.  And my only car at that time, a Honda Civic EK3, was about to be the test bed for my engine build.

Details on the engine build components are next.  Stay tuned!

Monday 4 July 2011

Chasis: New Color, New Name

Among the very first to be done in the makeover process, is the appearance.  While the light blue color might be cool in the US, over here my friends call it "Bas Kilang".  So it has to go.  I need it to be bright, but there are much too many "Spoon Yellow" around.  Something rare, but not too rare that it'll become weird.  I prefer the paint to be a standard mix directly off the chart, so it'll be easier should I need to do minor touch up in the future.

So finally, I had picked this from the chart on the wall of CYT Paintworks in Puchong.


Yeah, dude.  It is in fact the paint code for rims:  AK 26705 Sport Rim Paint Work Steel Gold, and I'm using it for the whole body.  Hence the new name: The GoldMember.

Here's the GoldMember in the making.


Sunday 3 July 2011

Engine: LPT Turbo

The previous owner was kind enough to let me have this car complete with the LPT Turbo kit in it.  Boosted at 0.4 Bar, the previous owner informed me that this setup was rather an "unfinished" project of his, and it could be further enhanced to produce more power to the wheel (Hint: Put more money in it!).  Well, at that time I have no interest (and knowledge) about Turbo, so I kept it at is was for awhile.  It was quite fun though with the wastegate sound and all, but not being able to use the whole rpm range (and some more!) on the stock meter cluster (typical NA VTEC syndrome), I just couldn't keep this for too long.  Heck I was even having problem to keep up with a "near stock" B16A powered car during a friendly "training" session, as the LPT engine went flat at about 4500rpm.

Here are some photos of the LPT Turbo 1.6L SOHC engine.